Chapter 17: Git Branches
While git is great for uploading and downloading code, its true benefits are its ability to support reversability (e.g., undo) and collaboration (working with other people). In order to effectively utilize these capabilities, you need to understand git’s branching model, which is central to how the program manages different versions of code.
This module will cover how to work with branches with git and GitHub, including using them to work on different features simultaneously and to undo previous changes. It will also discuss how to use branches to support different collaborative workflows, allowing multiple people to work on code in the same repository.
Helpful links:
- Git and GitHub in Plain English
- Atlassian Git Branches Tutorial
- Git Branching (Official Documentation)
- Learn Git Branching (interactive tutorial)
- Visualizing Git Concepts (interactive visualization)
- Resolving a merge conflict (GitHub)
- Atlassian Git Workflows Tutorial
17.1 Git Branches
So far, you’ve been using git to create a linear sequence of commits: they are all in a line, one after another).
Each commit has a message associated with it (that you can see with git log --online), as well as a unique SHA-1 hash (the random numbers and letters), which can be used to identify that commit, like an “id number”.
But sometimes we save commits in a non-linear sequence. Perhaps we want to try something new and crazy without breaking code that we’ve already written. Or we want to work on two different features simultaneously (having separate commits for each). Or we want multiple people to work on the same code without stepping on each other’s toes.
To do this, we use a feature of git called branching (because we can have commits that “branch off” from a line of development):
For example, we might have a primary branch (called the master branch), and we decide we want to try an experiment. We split off a new branch (called for example experiment), which saves some funky changes to our code. But then we decide to make further changes to our main development line, adding more commits to master that ignore the changes stored in the experiment branch. We can develop master and experiment simultaneously, making changes to each version of the code. We can even branch off further versions (e.g., a bugfix to fix a problem) if we wish. And once we decide we’re happy with the code added to both versions, we can merge them back together, so that the master branch now contains all the changes that were made on the experiment branch. If we decided that the experiment didn’t work out, we can simply delete those set of changes without ever having messed with our “core” master branch.
You can view a list of current branches in the repo with the command
git branch(The item with the asterisk (*) is the “current branch” you’re on. The latest commit of the branch you’re on is referred to as the HEAD.
You can use the same command to create a new branch:
git branch [branch_name]Will create a new branch called branch_name (replace this, including the brackets, with whatever name you want). Note that if you run git branch again you’ll see that this hasn’t actually changed what branch you’re on. In fact, all you’ve done is created a new reference (like a new variable!) that refers to the current commit as the given branch name.
You can almost think of this like creating a new variable called
branch_nameand assigning the latest commit to that! Almost like you wrotenew_branch <- my_last_commit.If you’re familiar with LinkedLists, it’s a similar idea to changing a pointer in those.
In order to switch to a different branch, use the command (without the brackets)
git checkout [branch_name]Checking out a branch doesn’t actually create a new commit! All it does is change the HEAD (the “commit I’m currently looking at”) so that it now refers to the latest commit of the target branch. You can confirm that the branch has changed with git branch.
You can almost think of this like assigning a new value (the latest commit of the target branch) to the
HEADvariable. Almost like you writeHEAD <- branch_name_last_commit.Note that you can create and checkout a branch in a single step using the
-boption of git checkout:git checkout -b [branch_name]
Once you’ve checked out a particular branch, any new commits from this point on will be “attached” to the “HEAD” of that branch, while the “HEAD” of other branches (e.g., master) will stay the same. If you use git checkout again, you can switch back to the other branch.
- Important checking out a branch will “reset” your code to whatever it looked like when you made that commit. Switch back and forth between branches and watch your code change!
Note that you can only check out code if the current working directory has no uncommitted changes. This means you’ll need to commit any changes to the current branch before you checkout another. If you want to “save” your changes but don’t want to commit to them, you can also use git’s ability to temporarily stash changes.
Finally, you can delete a branch using the git branch -d [branch_name]. Note that this will give you a warning if you might lose work; be sure and read the output message!
17.2 Merging
If you have changes (commits) spread across multiple branches, eventually you’ll want to combine those changes back into a single branch. This is a process called merging: you “merge” the changes from one branch into another. You do this with the (surprise!) merge command:
git merge [other_branch] --no-editThis command will merge other_branch into the current branch. So if you want to end up with the “combined” version of your commits on a particular branch, you’ll need to switch to (checkout) that branch before you run the merge.
When merging, git may create a new commit “combined” commit indicating that the branches have now been merged. The
--no-editoption will tell git to use the default commit message when creating the new “combined” commit. If you forget this, you’ll be thrown into the command-line editor. Remember, type:q!to escape from vi; if you do so, check thestatusof the repo to make sure the merge finished!- IMPORTANT If something goes wrong, don’t panic and try to close your command-line! Come back to the module and look up how to fix the problem you’ve encounter (e.g., how to exit vi. And if you’re unsure why something isn’t working with git, use
git statusto check the current status and for what steps to do next.
- IMPORTANT If something goes wrong, don’t panic and try to close your command-line! Come back to the module and look up how to fix the problem you’ve encounter (e.g., how to exit vi. And if you’re unsure why something isn’t working with git, use
Note that the
rebasecommand will perform a similar operation, but without creating a new “merge” commit–it simply takes the commits from one branch and attaches them to the end of the other. This effectively changes history, since it is no longer clear where the branching occurred. From an archival and academic view, we never want to “destroy history” and lose a record of changes that were made. History is important: don’t screw with it! Thus I recommend you avoid rebasing and stick with merging.
To practice creating and merging branches, see exercise-1.
17.2.1 Merge Conflicts
Merging is a regular occurrence when working with branches. But consider the following situation:
- You’re on the master branch.
- You create and
checkouta new branch calleddanger - On the
dangerbranch, you change line 12 of the code to be “I like kitties”. You then commit this change (with message “Change line 12 of danger”). - You
checkout(switch to) themasterbranch again. - On the
masterbranch, you change to line 12 of the code to be “I like puppies”. You then commit this change (with message “Change line 12 of master”). - You use
git merge dangerto merge thedangerbranch into themasterbranch.
In this situation, you are trying to merge two different changes to the same line of code, and thus should be shown an error on the command-line:

Merge conflict error
This is called a merge conflict. A merge conflict occurs when two commits from different branches include different changes to the same code (they conflict). Git is just a simple computer program, and has no way of knowing which version to keep (“are kitties better than puppies? How should I know?!”).
Since git can’t determine which version of the code to keep, it stops the merge in the middle and forces you to choose what code is correct manually.
In order to resolve the merge conflict, you will need to edit the file (code) so that you pick which version to keep. Git adds “code” to the file to indicate where you need to make a decision about which code is better:

Merge conflict
In order to resolve the conflict:
Use
git statusto see which files have merge conflicts. Note that files may have more than one conflict!Choose which version of the code to keep (or keep a combination, or replace it with something new entirely!) You do this by editing the file (i.e., open it in R Studio and change it). Pretend that your cat walked across your keyboard and added a bunch of extra junk; it is now your task to fix your work and restore it to a clean, working state. Be sure and test your changes to make sure things work!
Be sure and remove the
<<<<<<<and=======and>>>>>>>These are not legal code in any language.Once you’re satisfied that the conflicts are all resolved and everything works as it should, follow the instructions in the error message and
addandcommityour changes (the code you “modified” to resolve the conflict):git add . git commit "Resolve merge conflict"This will complete the merge! Use
git statusto check that everything is clean again.
Merge conflicts are expected. You didn’t do something wrong if one occurs! Don’t worry about getting one or try to avoid them, just resolve the conflict, fix the “bug” that has appeared, and move on with your life.
To practice resolving merge conflicts, see exercise-2.
17.3 Undoing Changes
One of the key benefits of version control systems is reversibility: the ability to “undo” a mistake (and we all make lots of mistakes when programming!) Git gives us two basic ways that we can go back and fix a mistake we’ve made previously:
We can replace a file (or the entire project directory!) with a version saved as a previous commit.
We can have git “reverse” the changes that we made with a previous commit, effectively applying the opposite changes and thereby undoing it.
Note that both of these require you to have committed a working version of the code you want to go back to. Git only knows about changes that have been committed—if you don’t commit, git can’t help you! Commit early, commit often.
For both forms of undoing, first recall how each commit has a unique SHA-1 hash (those random numbers) that acted as its “name”. You can see these with the git log --oneline command.
We can use the checkout command to switch not only to the commit named by a branch (e.g., master or experiment), but to any commit in order to “undo” work. We refer to the commit by its hash number in order to check it out:
git checkout [commit_number] [filename]This will replace the current version of a single file with the version saved in commit_number. You can also use -- as the commit-number to refer to the HEAD (the most recent commit):
git checkout -- [filename]If you’re trying to undo changes to lots of files, you can alternatively replace the entire project directory with a version from a previous commit by checking out that commit as a new branch:
git checkout -b [branch_name] [commit_number]This command treats the commit as if it was the HEAD of a named branch… where the name of that branch is the commit number. You can then make further changes and merge it back into your development or master branch.
- IMPORTANT NOTE: If you don’t create a new branch (with
-b) when checking out an old commit, you’ll enter detached HEAD state. You can’t commit from here, because there is no branch for that commit to be attached to! See this tutorial (scroll down) for details & diagrams. If you find yourself in a detached HEAD state, you can usegit checkout masterto get back to the last saved commit (though you will lose any changes you made in that detached state—so just avoid it in the first place!)
But what if you just had one bad commit, and don’t want to throw out other good changes you made later? For this, you can use the git revert command:
git revert [commit_number] --no-editThis will determine what changes that commit made to the files, and then apply the opposite changes to effectively “back out” the commit. Note that this does not go back to the given commit number (that’s what checkout is for!), but rather undoes the commit you specify.
This command does create a new commit (the
--no-editoption tells git that you don’t want to include a custom commit message). This is great from an archival point of view: we never “destroy history” and lose the record of what changes were made. History is important: don’t screw with it!The
resetcommand will destroy history. Do not use it, no matter what StackOverflow tells you to do.
17.4 GitHub and Branches
GitHub is an online service that stores copies of repositories in the cloud. When you push and pull to GitHub, what you’re actually doing is merging your commits with the ones on GitHub!
However, remember that we don’t edit any files on GitHub’s servers, only on own own local machines. And since resolving a merge conflict involves editing the files, we have to be careful that conflicts only occur on the local machine, not on GitHub. This plays out in two ways:
You will not be able to
pushto GitHub if merging your commits into GitHub’s repo would cause a merge conflict. Git will instead report an error, telling you that you need topullchanges first and make sure that your version is “up to date”. Up to date in this case means that you have downloaded and merged all the commits on your local machine, so there is no chance of divergent changes causing a merge conflict.Whenever you
pullchanges from GitHub, there may be a merge conflict! These are resolved in the exact same way as when merging local branches: that is, you need to edit the files to resolve the conflict, thenaddandcommitthe updated versions.
Thus in practice, when working with GitHub (and especially with multiple people, in order to upload your changes you’ll need to do the following:
pull(download) any changes you don’t have- Resolve any merge conflicts that occurred
push(upload) your merged set of changes
Additionally, because GitHub repositories are repositories just like the ones on your local machine, they can have branches as well! (You have seen that each learning module has a complete branch). You have access to any remote branches when you clone a repo; you can see a list of them with git branch -a (using the all option).
If you create a new branch on your local machine, it is possible to push that branch to GitHub, creating a mirroring branch on the remote repo. You do this by specifying the branch in the git push command:
git push origin branch_namewhere branch_name is the name of the branch you are currently on (and thus want to push to GitHub).
Note that you often want to associate your local branch with the remote one (make the local branch track the remote), so that when you use git status you will be able to see whether they are different or not. You can establish this relationship by including the -u option in your push:
git push -u origin branch_nameTracking will be remembered once set up, so you only need to use the -u option once.
17.4.1 GitHub Pages
GitHub’s use of branches provides a number of additional features, one of which is the ability to host web pages (.html files, like what you generate from R Markdown) on a publicly accessible web server that can “serve” the page to anyone who requests it. This feature is known as GitHub Pages.
With GitHub pages, GitHub will serve your files visitors as long as the files are in a branch with a magic name: gh-pages. Thus in order to publish your webpage and make it available online, all you need to do is create that branch, merge your content into it, and then push that branch to GitHub
You almost always want to create the new gh-pages branch off of your master branch. This is because you usually want to publish the “finished” version, which is traditionally represented by the master branch. This means you’ll need to switch over to master, and then create a new branch from there:
git checkout master
git checkout -b gh-pages
Checking out the new branch will create it with all of the commits of its source meaning gh-pages will start with the exact same content as master—if your page is done, then it is ready to go!
You can then upload this new local branch to the gh-pages branch on the origin remote:
git push -u origin gh-pagesAfter the push completes, you will be able to see your web page using the following URL:
https://GITHUB-USERNAME.github.io/REPO-NAME(Replace GITHUB-USERNAME with the user name of the account hosting the repo, and REPO-NAME with your repository name).
- This means that if you’re making your homework reports available, the
GITHUB-USERNAMEwill be the name of the course organization (e.g.,info201-w17).
Three important notes:
The
gh-pagesbranch must be named exactly that. If you misspell the name, or use an underscore instead of a dash, it won’t work.Only the files and commits in the
gh-pagesbranch are visible on the web. All commits in other branches (experiment,master, etc.) are not visible on the web (other than as source code in the repo). This allows you to work on your site with others before publishing those changes to the web.Any content in the
gh-pagesbranch will be publicly accessible, even if your repo is private. You can remove specific files from thegh-pagesbranch that you don’t want visible on the web, while still keeping them in themasterbranch: use thegit rmto remove the file and then add, commit, and push the deletion.- Be careful not push any passwords or anything to GitHub!
After you’ve created your initial gh-pages branch, any changes you want to appear online will need to be saved as new commits to that branch and then pushed back up to GitHub. HOWEVER, it is best practice to not make any changes directly to the gh-pages branch! Instead, you should switch back to the master branch, make your changes there, comit them, then merge them back into gh-pages before pushing to GitHub:
# switch back to master
git checkout master

### UPDATE YOUR CODE (outside of the terminal) ###

# commit the changes
git add .
git commit -m "YOUR CHANGE MESSAGE"

# switch back to gh-pages and merge changes from master
git checkout gh-pages
git merge master

# upload to github
git push --all
(the --all option on git push will push all branches that are tracking the remote).
This procedure will keep your code synchronized between the branches, while avoiding a large number of merge conflicts.
17.5 Collaborative Workflows
Being able to merge between branches allows you to work collaboratively, with multiple people making changes to the same repo and sharing those changes through GitHub. There a variety of approaches (or workflows) that can be used to facilitate collaboration and make sure that people are effectively able to share code. In this section we will discuss the recommended, branch-based workflow called the Feature Branch Workflow.
17.5.1 Repository Setup
The Feature Branch Workflow uses a centralized repository stored on GitHub—that is, every single member of the team will push and pull to a single GitHub repo. However, since each repository needs to be created under a particular account, this means that a single member of the team will need to create the repo (such as by accepting a GitHub Classroom assignment, or by clicking the “New” button on their “Repositories” tab on the GitHub web portal).
In order to make sure everyone is able to push to the repository, whoever creates the repo will need to add the other team members as collaborators. You can do this under the Settings tab:
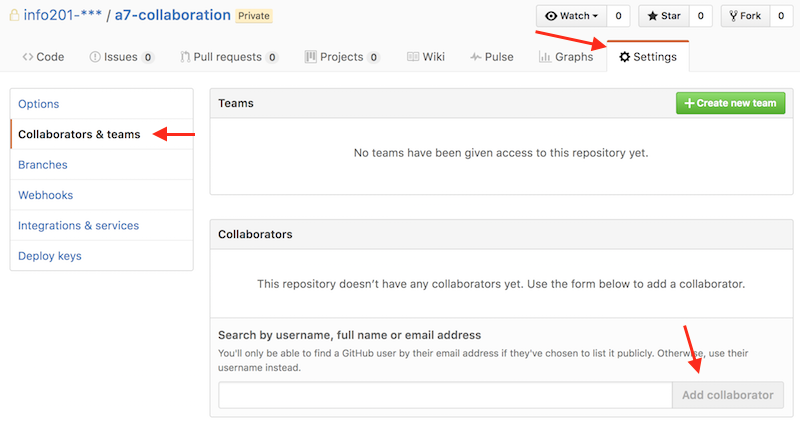
Add collaborator menu
Once you’ve added everyone to the GitHub repository, each team member will need to clone the repository to their local machine to work on the code individually. Collaborators can then push any changes they make to the central repository, and pull and changes made by others.
17.5.2 Feature Branches
The core idea behind the feature branch workflow is that all development should take place on a dedicated feature branch, rather than on the master branch. This allows for different people to work on different branches without disturbing the main codebase. For example, you might have one branch visualization that focuses on adding a complex visualization, or another experimental-analysis that tries a bold new approach to wrangling the data. Each branch is based on a feature (capability or part) of the project, not a particular person: a person could be working on multiple feature branches.
The idea is that the master branch always contains production-level code: valid, completely working code that you could deploy or publish (read: give to your boss or teacher) at a whim. Each feature branch branches off of master, and are allowed to contain temporary or broken code (since they are still in development). There way there is always a “working” (if incomplete) copy of the code (master), and development can be kept isolated and considered independent of the whole. This is similar to the example with the experiment branch above.
The workflow thus works like this:
Ada decides to add a new feature or part to the code. She creates a new feature branch off of master:
git checkout master
git checkout -b adas-feature
Ada does some work on this feature
# work is done outside of terminal

git add .
git commit -m "Adds progress on feature"
Ada takes a break, pushing her changes to GitHub
git push -u origin adas-featureAfter talking to Ada, Bebe decides to help finish up the feature. She checks out the branch and makes some changes, then pushes them back to GitHub
# fetch will "download" commits from GitHub, without merging them
git fetch origin
git checkout adas-feature

# work is done outside of terminal

git add .
git commit -m "Adds progress on feature"
git push origin adas-feature
Ada downloads Bebe’s changes
git pull origin adas-featureAda decides the feature is finished, and merges it back into
master. But first, she makes sure she has the latest version of themastercode to integrate her changes withgit checkout master # switch to master git pull origin master # download any changes git merge adas-feature # merge the feature # fix any merge conflicts!! git push origin master # upload the updated code to masterAnd now that the feature has been successfully added to the project, Ada can delete the feature branch (using
git branch -d branch_name). See also here.
This kind of workflow is very common and effective for supporting collaboration. Note that as projects get large (beyond the size you’ll do in this class), you may need to start being more organized about how and when you create feature branches, For example, the Git Flow model organizes feature branches around product releases, and is often a starting point for large collaborative projects.